
Automated recurring payments are essential for subscription-based businesses. They not only streamline your cash flow but also enhance the member experience by eliminating the need for manual payments. This guide will walk you through the process of setting up automated payments for your recurring memberships using Cardby and Stripe.
Why Automated Payments Matter
Before we dive into the setup process, let’s briefly discuss why automated payments are crucial:
- Improved Cash Flow: Ensure timely payments and reduce late or missed payments.
- Enhanced Member Experience: Offer convenience to your members with hassle-free renewals.
- Reduced Administrative Work: Minimize the time spent on payment collection and follow-ups.
- Increased Retention: Make it easier for members to maintain their subscriptions.
Prerequisites
Before setting up automated payments, ensure you have:
- Created your membership forms in Cardby
- Defined your membership tiers and pricing
- A Stripe account (if you don’t have one, you’ll create it during the process)
Step-by-Step Guide to Setting Up Automated Payments
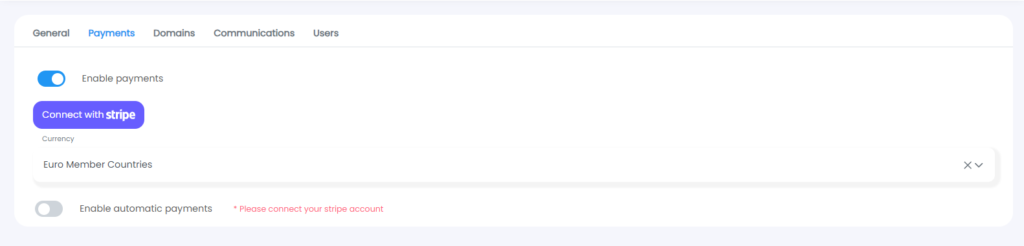
1. Enable Stripe Connect
- Navigate to your Project Settings in Cardby.
- Locate the Payments Section.
- Look for the option to enable Stripe Connect.
- Click on it and follow the prompts to connect your Stripe account or create a new one.
2. Create Products and Prices in Stripe (optional)
If you’re new to Stripe, you can either set up your products and prices in Stripe or let Cardby create it for you during the membership setup.
In the case you want to do it in Stripe you can follow these steps:
- Log into your Stripe Dashboard.
- Navigate to “Products” in the sidebar.
- Click “Add Product” and fill in the details for each membership tier.
- For each product, create a price that corresponds to your membership fee and billing frequency.
Those are the simplified steps, if you are looking for further Stripe customisation take a look at their Stripe: How to Create Products & Prices
Pro Tip: Make sure your product names in Stripe clearly correspond to your membership tiers in Cardby for easy matching later.
3. Test Your Setup
Before going live, it’s crucial to test your automated payment system:
- Create a test membership sign-up.
- Use Stripe’s test card numbers to simulate a successful payment.
- Verify that the payment is recorded correctly in both Cardby and Stripe.
4. Go Live
Once you’ve confirmed everything is working correctly:
- Update your membership forms or pages to reflect the new automated payment option.
- Inform your existing members about the new automated payment system and how they can opt-in.
Best Practices for Automated Payments
- Communicate Clearly: Ensure your members understand when and how much they’ll be charged.
- Offer Flexibility: Consider providing options for different payment frequencies (monthly, annually, etc.).
- Set Up Dunning: Use Stripe’s dunning management to automatically retry failed payments and reduce churn.
- Monitor Analytics: Regularly check your payment analytics in Cardby to track subscription health and member behavior.
Conclusion
Setting up automated payments for your recurring memberships is a game-changer for subscription-based businesses. By following this guide and leveraging Cardby’s integration with Stripe, you’re well on your way to streamlining your payment processes and improving your members’ experience.
Remember, while automation is powerful, it’s still important to maintain a personal touch with your members. Use the time saved from manual payment processing to focus on delivering value and building stronger relationships with your community.
Happy automating!